In an effort to reduce the amount of physical stuff I have, I had a thought: what If I could just take my Windows 10 laptop, remove the hard drive, and boot it on my Mac Mini? I’m not talking about installing Windows 10 on a Mac Using Boot Camp or installing a fresh Windows 10 VM on a Mac. What I wanted to do was plug my hard drive into my Mac, fire it up, and have it be like I’m sitting in front of my old laptop, but you know, not have to keep my old laptop around. It was easier than I thought. I’ll show you how to do it. (A quick note of caution: Although the process is easy, there is always a risk when you remove a hard drive and mount it elsewhere. Click the wrong button, remove it from a computer unsafely, or spill coffee on it–things can happen. Make sure you back up any critical data before proceeding with this project!)
Remove Your Laptop Hard Drive
This will either be the easy part or the hard part, depending on what kind of laptop you have and your comfort level with tiny screwdrivers. The exact steps will vary for you, but for me, it was as simple as flipping it over and unscrewing one panel.
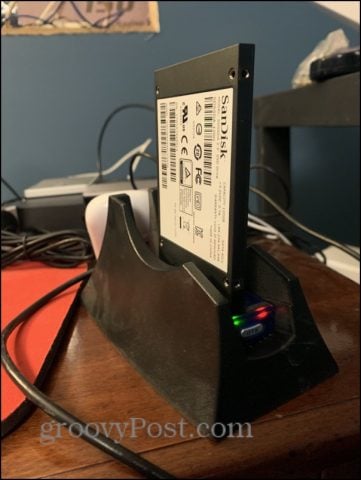
My hard drive (technically, it’s a solid state drive, as you can see) slid right out. I had to remove the little frame on it. Once I got that off, I plugged it into my USB hard drive dock.
USB Hard Drive Dock or Hard Drive Enclosure
What’s a USB hard drive dock? It’s a simple adapter that lets you connect a SATA hard drive to another computer using USB. Mine is pretty basic, it is just an adapter that slides into a stand and it takes 2.5-inch or 3.5-inch hard drives. You can get a docking station one like me or a USB hard drive enclosure for less than $20.
VirtualBox on macOS
Once you get your hard drive physically connected to your Mac, go grab yourself a copy of VirtualBox. It’s free!
Create a Raw Disk VMDK
Now, you want to take your physical hard drive and have VirtualBox treat it like a virtual machine disk. Start by finding the mount point of your hard drive. Open up Disk Utility. Press Command + Space and then type Disk Utility if you’re having trouble finding it. Find your hard drive and right-click it. Choose Unmount. Make sure you do not eject it. Just unmount it.
Next, open up Terminal. Enter the following command: Look through the list for your hard drive. You should recognize it by its type, size, and any indications that it has Windows_NTFS on it. Take note of the mount point. It’ll be something like /dev/disk#
Type: And, of course, replace the “/dev/disk3” with whatever your hard drive is and “/Users/Jack” with whatever your username is.
You ought to get a message saying “Raw host disk access VMDK file [whatever] created successfully.” Now, before you leave Terminal, launch VirtualBox with admin privileges. To do that, type:
Create a Windows 10 Virtual Machine in VirtualBox
Now that you’ve launched VirtualBox as an admin, create a new virtual machine. Under the hard disk options, choose “Do not add a virtual hard disk.”
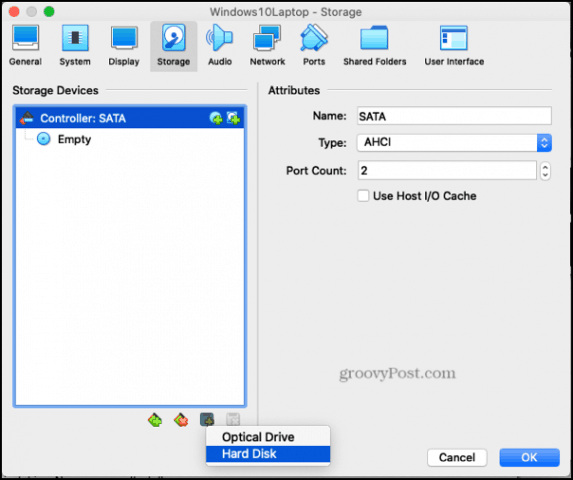
After your machine is created, open up the Settings for the VM and choose Storage. Click the add button at the bottom and choose Hard Disk.
On the next screen, add the .vmdk file you just created in Terminal.
After that’s done, you should be all set. Cross your fingers and start your virtual machine…
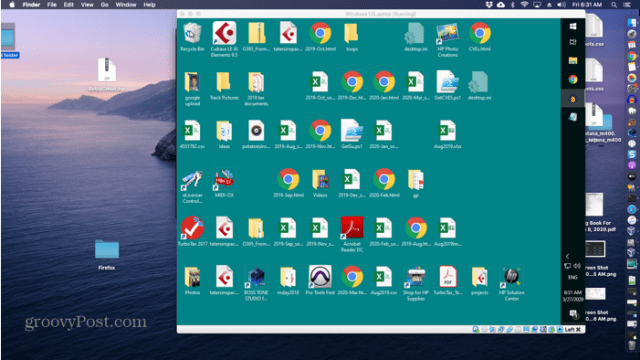
If all goes well, you should see your Windows 10 desktop on your VM, just like you had booted the original machine. Now you can access your old Windows 10 installation without having an entire other computer. If you get tired of this set up (it’s a little slower…), you can always pop it back into your laptop.
Troubleshooting
As I was going through this process, I hit a few snags. Here are some possible error messages and remedies:
“Access denied” or “VERR_RESOURCE_BUSY” – Make sure your disk is unmounted in Disk Utility. You may need to unmount the disk again, even if you did it already.“Permission problem accessing the file for the medium (VERR_ACCESS DENIED) VBOX_E_FILE_ERROR (0x80BB0004)” – Make sure you launch VirtualBox with sudo privileges.“Cannot open the raw disk ‘/dev/disk3’: VERR_ACCESS_DENIED” – Make sure the disk is unmounted in Disk Utility“Error code VERR_FILE_NOT_FOUND at /Users/vbox/tinderbox/mac-rel/src/VBox/Storage/VMDK.cpp(3402) in function int vmdkCreateRawImage(PVMDKIMAGE, const PVDISKRAW, uint64_t)” or “Cannot create the raw disk VMDK: VERR_FILE_NOT_FOUND” – Make sure your destination save path exists. Replace your user name for “Jack” in my example above.
![]()


