How To Add Hotmail, Office, And Other MS Live Services To Your Domain
- Visit https://domains.live.com and Type your domain name into the blank box. Since setting up mail is the default option, we’ll leave it like that for this tutorial. Click Continue.
2. Next, you can choose whether you want an already existing Windows Live account to be the domain administrator or, you can set up a new Live ID to be the administrator account. If this is a small personal site of yours I recommend the latter* but either option works just fine. Click Continue once you’ve made your selection. *It can get tricky when logging into both the administrator account for your domain and the user account for your domain if you are using a single computer. It makes it more convenient to have your domain administrator be a Live account @yourdomain.com. Larger organizations may find this option less secure.
3. On the next page, you’ll just review what you’ve typed in. Click I Accept to continue.
4. Live services require that you prove you are the owner or administrator of the domain you are setting up. To do this, you’ll need to set up an MX record under the domain host.* I’ll show you how to do this in the article. *Alternatively you can add a CNAME record. However, this is only a temporary solution, and Microsoft will require you to enter an MX record after 30 days.
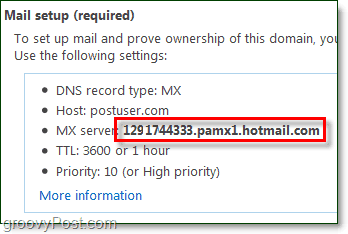
5. On your Live domain administration page, you’ll see a box that looks like the one in the screenshot below labeled Mail setup. Copy the MX server: line. It should read something like 1291744333.pamx1.hotmail.com. Be careful not to share this address with anyone as it could compromise your email security.
Note – Some domain hosts do not allow customers to manually edit MX records, so you might have to contact your hosting company and ask them to enter this MX record for you.
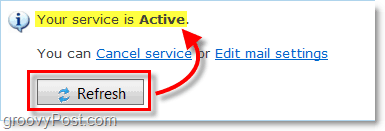
7. Once you’ve set up the MX record with your domain host, go back to your Live services domain page. Give your domain a few minutes to apply the change to the MX records and note that time can vary depending on who your host is. On your Live admin page, Click Refresh. If you added the MX record successfully, you should now see a message that says “Your service is Active.”
8. Next, go down the Live admin page and copy the Value data from the section labeled Server trust as seen in the screenshot below.
9. Now you’ll have to go back to your host again and set up a custom TXT DNS record. Again, depending on who your provider is you may not be able to change these settings yourself, so don’t hesitate to contact your host if you can’t find where to change DNS records. If you can, though, simply make a TXT DNS record and then paste in the value v=spf1 include:hotmail.com ~all.
10. (Optional!) To set up Live Messenger for use with your domain accounts you’ll need to set up an SRV DNS record for it. You’ll most likely have to contact your domain host and have them set this up for you. Just send them the information under Messenger Configuration from your Live domain admin page.
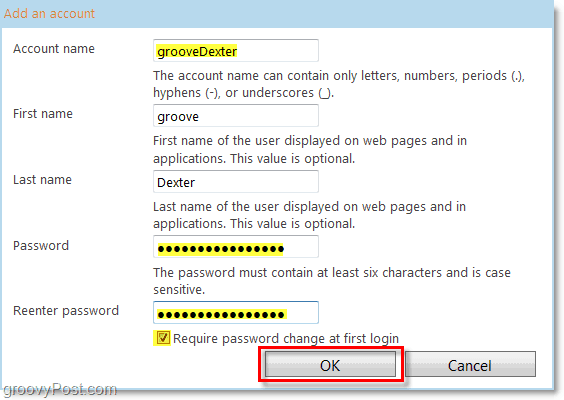
Now you should be ready to go. The only thing left to do is to add accounts and apply a few optional settings. 11. The next step is to add a member account or set up open membership. Since I don’t like the idea of EVERYONE being able to sign up for email on my domain, I’m going to keep membership closed and just create my members myself.
12. Adding an account to your domain is a lot like making a Live account, just for other people. To keep things simple for you there is an option to require a password change at first login. If you check this box you can just give all of your users the same default password and once they start using their account they’ll have to change it to their own; groovy!
13. Once you’ve added the accounts, your users can sign-in at https://mail.live.com. It’s just like signing into a regular Hotmail account, except the username will be @yourdomain.com
14. Users would be required to verify their information during login and change their password if you opted for that option during setup.
Done! That’s all there is. You can start up and use email from your @yourdomain with Windows Live from now on. All of the features are the same as regular Hotmail, and now you don’t have to worry about managing your own mail server which is nice. It’s hard to find a downside here especially when you consider the free 5 Gig Mailbox and SPAM protection!
The same goes for Windows Live Messenger. If you set up the optional messenger services with your domain, you can now log into messenger using your @yourdomain account.
One question: Google Apps has a way of lagging behind the rest of Google’s services in terms of features and application integration (like how Picasa isn’t yet integrated with Apps). Does Windows Live custom domain service parallel changes in the rest of the Live services? Comment Name * Email *
Δ Save my name and email and send me emails as new comments are made to this post.


![]()
