Adding a Custom URL Upon Page Creation
Before we get to your profile page, let’s take a quick look at customizing the URL’s for your Facebook pages. First of go to http://facebook.com/pages. On the upper right side you will see a “+ Create Page” button. Click it to continue with page creation.
From here on, you will be asked for the category of your group. Since I created a temporary group for the purpose of this tutorial, I put mine under “Cause or Community”, but think carefully about what your group will really be about and pick your category wisely.
Pick a name, check the box to accept the terms and click Get Started.
Next you’ll need to complete 3 small steps in order to get your group setup. Since we’re only interested in the third one, we won’t go over the first two, but if you are really creating a group make sure you fill those out before jumping into the “Facebook Web Address” part.
Once you reach the end of the setup, simply enter your desired group URL and then click Set Address. If the name is available you should be good-to-go.
Changing/Creating the Custom URL of a Page
If you decided to rename your group and you’re annoyed because your URL doesn’t match anymore or you misspelled something in your URL, facebook gives you a second chance by allowing you to change the URL. But WATCH OUT – If you have a URL which is already set, you can only change the URL once – afterwards it will be permanent! Go to your current page and click Edit Page > Manage Permissions from the Admin Panel.
Once you’ve made your way into the Page Settings, choose the Basic Information category and then select Username > Create a username for this page.
Click / Change Username.
Now carefully enter your new page URL, replacing the old one, and click the Check Availability button to make sure someone hasn’t already taken the custom URL.
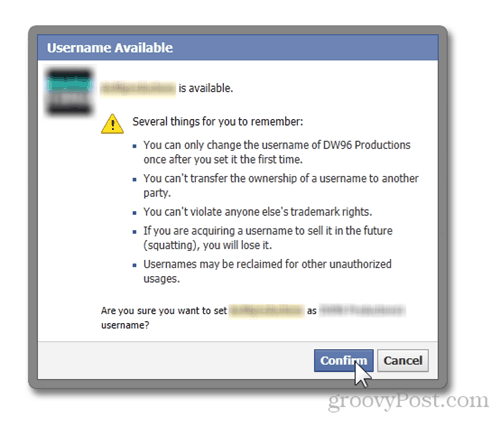
If you’re lucky and your username is available, you will be prompted with a small warning regarding what will happen after the URL is set. Make sure you read them carefully and if everything is OK, press Confirm and enjoy your new Page URL!
Add a Custom URL to Your Profile Page
Maybe we left the best for last, but adding a custom URL to your profile is a double-sided blade, since unlike Facebook pages, you can only add a custom URL once. Again, you absolutely cannot change the URL after it is set it. You’ve been warned. Click the small arrow to the right of the Home button on the top of the page. From there, select Account Settings:
Click the General Tab and Usernames. Enter your desired Username / Custom URL plus your password to confirm. A last reminder – be careful since you can only change your username / customer URL for your profile page ONCE.
Once completed, Facebook will display your new Profile URL that you chose.
Comment Name * Email *
Δ Save my name and email and send me emails as new comments are made to this post.


![]()
