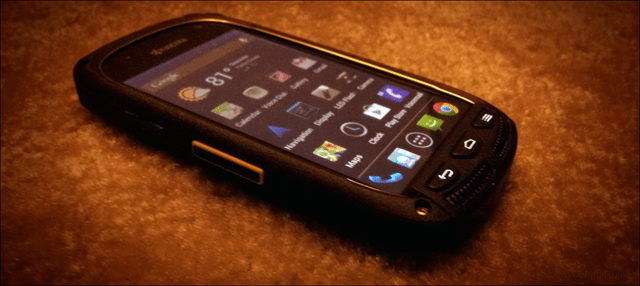
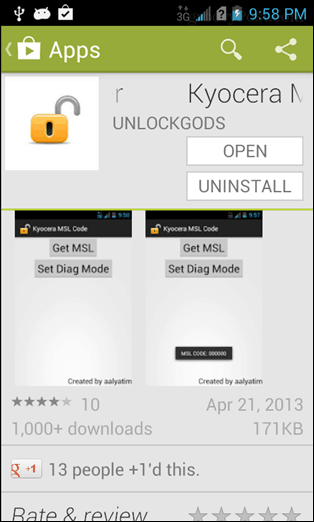
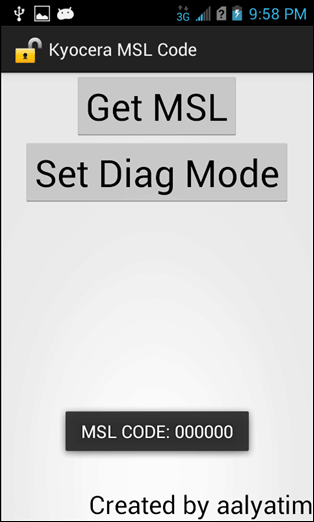
The Kyocera Torque is one of those tough phones designed for military use. Wirefly investigator took it for a test drive. After running it through the washing machine, freezing it in a block of ice, and dropping it off of a second story roof onto pavement the phone was still working and in pretty good shape. On top of that it’s quick, snappy, is running JellyBean, and is extremely easy to root There’s just one problem… The phone isn’t available on Virgin Mobile, a service I’ve been using for years since it doesn’t charge out the wazoo like Sprint does. The solution? Program it yourself using a Virgin Mobile donor phone. On the Torque this process is relatively simple and shouldn’t take more than few minutes. The hardest part is bringing all the little pieces together, and speaking of which here are the requirements. Disclaimer: This tutorial involves swapping the MEID/ESN numbers between two phones that you own. The legality of this is not known for all regions. In most cases you are fine as long as you shelf the donor phone and do not use it. Issues: With the Torque on Virgin Mobile multimedia-messaging (MMS) does not work, regular SMS/text does work though. You can attempt to fix it yourself following this guide, however I can’t guarantee success with getting MMS working. It’s complicated on Virgin Mobile with nearly any phone. Also a “No Sim Card” message will display at the bottom of the lock screen, it however does not effect the 3G or voice connection. If you wish to have 4G LTE working then your Virgin Mobile donor phone must use a 4G LTE sim card which you can insert into the Torque. To start this out we’re going to assume you already have the MEID (looks like A00000J43KL), the MSID (looks like a phone number from your area code), and the AAA_password from the donor phone. If you have these things, put the donor phone on airplane mode, and keep it shut off and shelved indefinitely. You cannot allow the donor phone to be turned on and connected to the network while your Torque is on Virgin Mobile or you will flag a security error 16 (two phones on the same line) and the line will lock up until you call in and have support reset it. If for some reason you need to use the donor phone while your Torque is active, shut off the Torque and wait 10-15 minutes in between switching phones to be safe. Got all that? Great! Go ahead and install everything listed above. Half of this is done on your computer with the phone connected. A little bit is done on just the phone itself. Let’s start by getting the MSL code (essentially a master password for your phone’s programming). We’ll need this code in order to use QPST to program it. Launch the Kyocera MSL Reader app and tap Get MSL. The 6-digit numeric code should display below. Write down this code so you don’t forget it, but we can change it in little so don’t get too attached. Next tap Set Diag mode. With diag mode enabled the computer will be able to connect to the phone’s modem over USB.
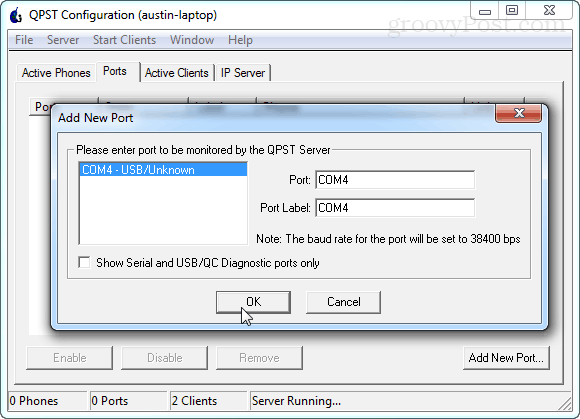
Now connect the phone to the computer via USB and launch QPST Configuration. Yeah that is the name of the program… I originally thought I was opening a config add-on the first time I ran it too. Anyhow, you don’t need to do much in this program. Just click Add New Port and then uncheck “Show Serial and USB/QC Diagnostic ports only.” Highlight the USB port your phone is on and then click OK. More info: Chances are you will only see one port here. If you have multiple ports don’t worry about picking the wrong one, nothing bad will happen. You will have to try again though until you find the right one. You’ll know it’s the right one because the listing will show up under Active Phones. If you aren’t seeing any ports, try enabling USB debugging, re-plugging the phone, and restarting the phone or computer.
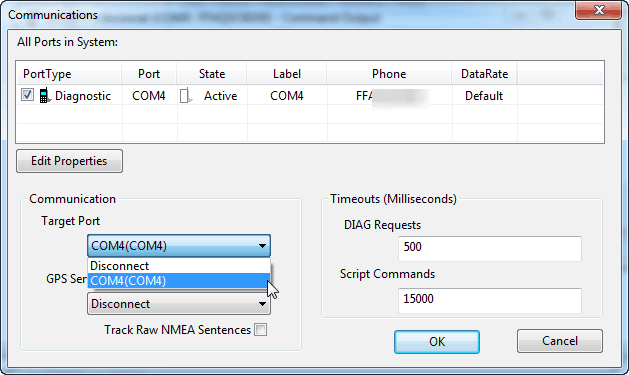
That’s all for now in QPST. Leave it open, but go ahead and launch QXDM Professional. Immediately click Options > Communications from the menu. By default QXDM won’t be able to send commands to your phone because its targeting the wrong port. TO fix this change the Target Port from disconnect to the port with your phone active on it. Click OK to exit.
Now for the commands. In the white command box here are few lines to type in along with an explanation of what each does.
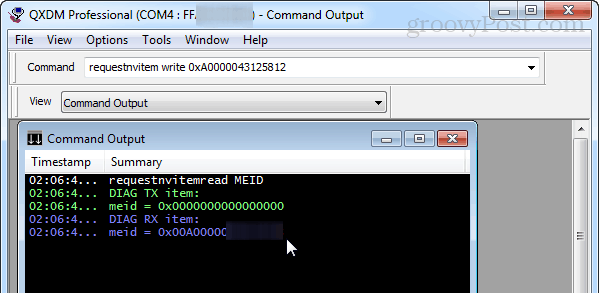
RequestNVitemRead MEIDThis reads the current MEID of the phone and displays it as an RX item. Use this first if you want to write down the current Sprint MEID incase you want to sell the phone or bring it back to stock for some reason.RequestNVitemWrite MEID 0xA00000#####This is used to overwrite the current MEID with the donor phones MEID. Just paste in your MEID from your donor phone with a 0x appended to the front. Replace the # signs with whatever your MEID is made up of.
After writing the MEID it should display it below as an RX item confirming it was entered. Make sure you don’t have any typos! It is normal for QXDM to add 0x00 before the MEID starts. You can even type it in that way if you want, QXDM will still automatically add the extra two zero’s if you do it like listed above. In short, the MEID will read back 0x00A00000##### with whatever numbers yours is made up of.
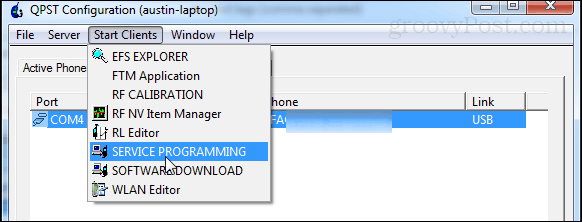
Close QXDM and go back to QPST. Highlight the phone from the listing and then click Start Clients > Service Programming.
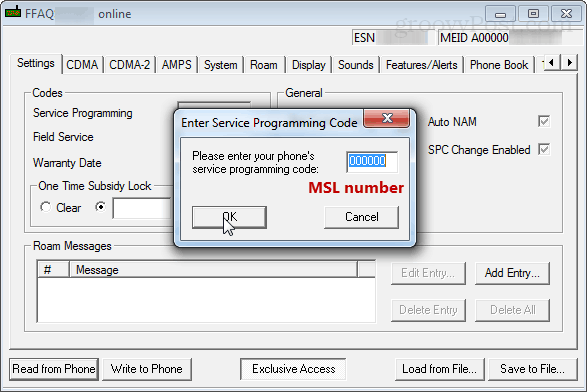
A brief phone selection screen will appear. There isn’t much to click here except for OK so go ahead and click it. Now onto the main QPST window. At the bottom-left click Read from Phone. QPST will request that you enter in the MSL code to unlock it. Lucky for us, we already have it written down from using an app for that earlier. Enter it in and click OK. This will fill in the blanks on several of the boxes in QPST.
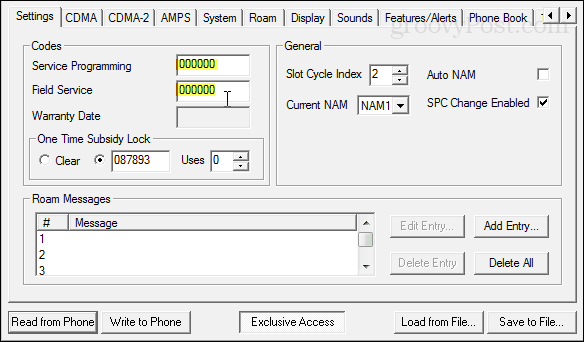
For the majority of the rest of this guide try to touch as little as possible unless you know what you are doing. I highlighted boxes that need to be edited in the screenshots below. Here is your chance to change the MSL. On the first tab, Settings, you can change the MSL by setting the Service Programming number to any 6 digits you want. 000000 is fairly common and easy to remember so many people change it to that. The Field service box will also request an extra digit since it only has 5 for some reason. You can make it also 000000 if you like. Onto the next tab, don’t worry about saving – we’ll write everything to the phone at once at the end.
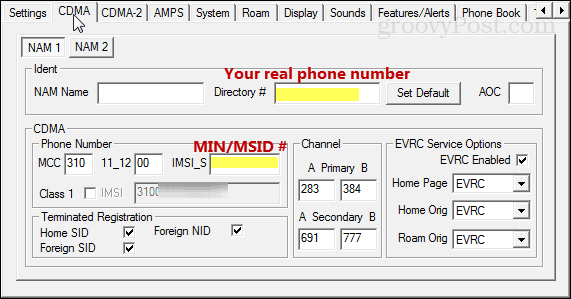
Click the CDMA tab and enter in your real phone number (the one people call you with) in the Directory # box. And now below it enter the MSID from the donor phone. Remember that the MSID looks JUST like a 10 digit phone number, it probably even has the same area code as your Directory #.
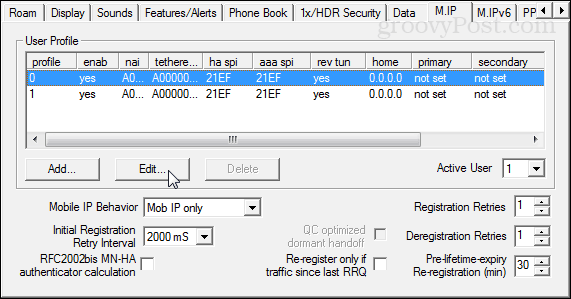
Next up is the M.IP tab. To get to this you may need to click the little horizontal arrows over to the right a bit. There are two profiles here to edit. That’s all we need to do on this page. Select the top one and click Edit.
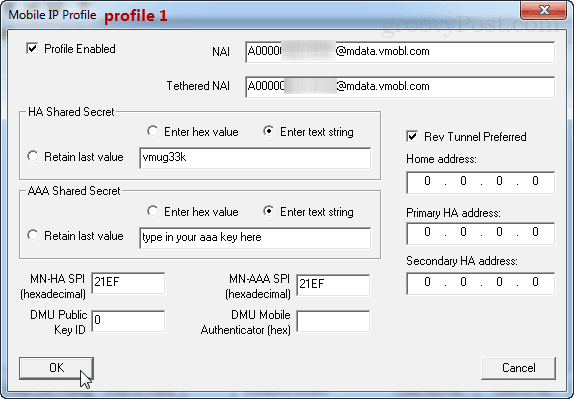
Profile 0 needs to look like the screenshot and description below: NAI: A00000####@prov.vmobl.com Tethered NAI: A00000####@prov.vmobl.com HA Shared Secret: vmug33k AAA Shared Secret: type in the unique AAA password from your donor phone. MN_HA SPI: 21EF MN-AAA SPI: 21EF Rev. Tunnel Preferred checked on All IPs set to 0.0.0. For the NAI the line is made up of the MEID from your donor phone followed by @prov.vmobl.com.
Profile 1 is almost identical save for the @prov part changes to @mdata. NAI: A00000####@mdata.vmobl.com Tethered NAI: A00000####@mdata.vmobl.com HA Shared Secret: vmug33k AAA Shared Secret: type in super secret AAA key from the donor phone MN_HA SPI: 21EF MN-AAA SPI: 21EF Rev. Tunnel Preferred checked on All IPs set to 0.0.0. Same goes for the NAI here. It’s your MEID followed by @mdata.vmobl.com.
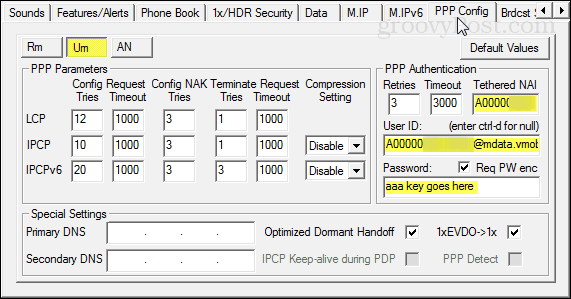
That’s all for profiles. Now we move onto the last section, the PPP Config. Click the UM sub-tab. Enter in A000yourMEID@mdata.com (change this to match your actual MEID) in both the Tethered NAI box and the User ID. For the password line type in your aaa_password from the donor phone.
THe AN tab is similar to the Um tab except there is no Tethered NAI to worry about. Enter in the same data as before.
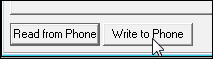
That’s all! Click Write to Phone to save changes and restart the device. Everything should work now if you are using the correct information and didn’t make any typos. After the restart try placing a call, sending a text, and browsing the web. If everything works, you’re golden!
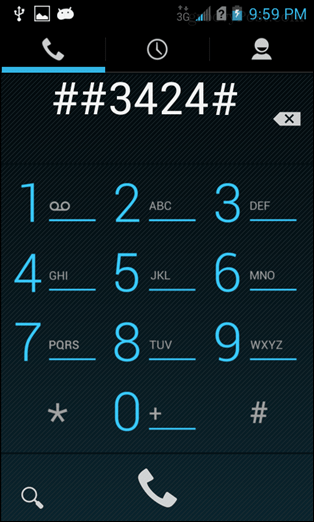
Everything working?! Great! Congrats your Torque is now activated on Virgin Mobile. Remember how we enabled Diag mode early in that MSL reader app? Let’s disable it now. To do so open the phone dialer and type in ##3424# (##diag#) and then type in your MSL code.
Change Diag to disabled and then tap back twice to exit. This isn’t necessary but it will make it so the modem isn’t connecting every time you connect the phone to USB. That’s all! Enjoy using your Kyocera Torque on Virgin Mobile! If you have any questions or comments ask them below or in the forum!
The above guide seems to be very accurate and I used it partially to help move the Kyocera Torque to Ting service. How I got it to work on Ting with help from the above guide! – Get a cheap Sprint phone as a donor and port it to Ting. I got a heavily used M370 vero phone on the ebays for about 12 bucks total. – Do a google search “m370 donor site:ting.com” to find some guides related to AAA and HA passes. – Follow Austin’s guide above until you program the M.IP tab. Ting does not use PPP configs, only M.IP configs: Google “Nexus S on Ting site:ting.com” to find the correct settings for M.IP . – Took me weeks to find out that my PRL, no matter how much I didn’t think it was, caused my phone never to get any 3g speeds. Google “61087 site:ting.com” (DL is found on someone’s comment for an Optimus S), use that PRL on the Vero with QXDM, under the Roam tab. This is how I got the 3G to work! Ignoring the PPP config in QXDM, the rest of the guide seems to work for porting to Ting! Thanks again! I am wondering if there is a guide like this to do the same exact thing but with Boost Mobile. would this work with a phone network in my country, Denmark? @prov.vmobl.com and @mdata.vmobl.com Can you explain what these are and how they would change if i were to attempt this procedure with a straight talk donor phone? Thanks. Comment Name * Email *
Δ Save my name and email and send me emails as new comments are made to this post.


![]()
