Article Map
Step 1 – Create the Users and Email Addresses in Google Apps
Before we configure Google Apps to receive emails for our Domain Name (cutover the MX records in DNS) we need to first create all the user accounts for our small business, charity etc.. Obviously if we cutover the email before creating the email addresses the mail is going to bounce, which is not good.
Simply Click Users and groups Tab then Click Create a new user
Fill in the First name, Last name as well as the username and Click Create new user. The username will be the users email address and login to Google Apps. Optional If your domain has more than just a few users, I recommend you use the Bulk Upload feature which can be found from both this screen (Create multiple users link) or from the Advanced Tools tab as shown in the Screenshot below.
After creating the user, Google Apps will present you with a small popup which contains all the info you need to provide to your employee including their username, password, email address and login link for your domain. Also included for convenience is 2 methods for getting this information to your end user. I recommend clicking the Email instructions button to have the info sent either to you or the new user.
Step 2 – How-To Setup the Google Apps Catch-All Email Address
Once all your User / Email Accounts are setup, you should enable a groovy Google Apps feature called the Catch-all address. The Catch-All address does exactly what it sounds like. If someone sends an email to your domain and the address doesn’t match any existing user email address it will be delivered to the address you specify. The Catch-all address is especially important for newly migrated domains where you might have forgot to create an email address for one of your employees or departments (like sales@groovypost.com). Rather than drop or return the email, Google Apps will deliver the email to your Catch-all address.
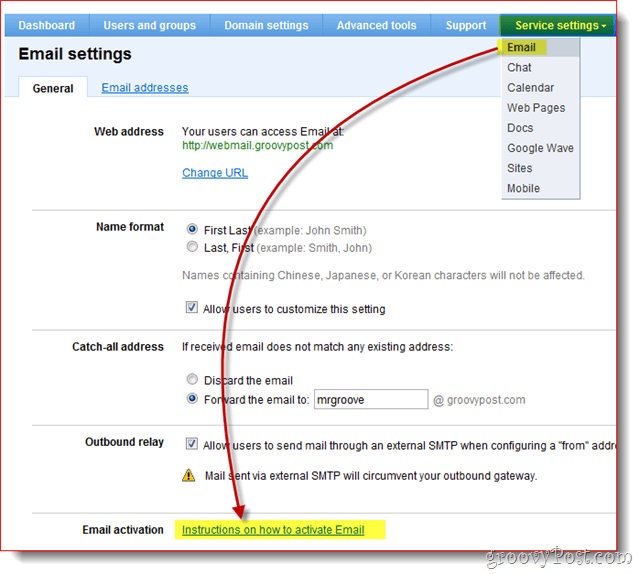
- Click Service settings, Email. Click the radio button Forward the email to: and Enter the email address for the Catch-All. Click Save Changes at the bottom of the page to save the new config.
Personally I like to use my Admin account for the Catch-All address because I like to setup accounts on websites using email addresses like dropbox@groovypost.com. Since I’ve not setup that address for any of my users, all those emails will be delivered to my mailbox aka the Catch-All address.
Step 3 – Create a Custom Webmail Address for Your Users
Although you can access Google Apps using Outlook or some other mail client, one of the selling points of Google Apps is the ability to access your company email from a web browser. By default however, the address is not very pretty or easy to remember: http://mail.google.com/a/yourdomain.com Good news, Google Apps gives you the ability to customize the link to something more attractive and easy to remember like http://webmail.yourdomain.com. I highly recommend everyone enable this feature in order to make the transition to Google Apps as smooth as possible for your end users.
Click Service settings Tab, General Tab then then Click Change URL under the Web Address section
Click the 2nd Radio button then enter the address (sub-domain) you want to assign for your Webmail access. Click Continue when done.
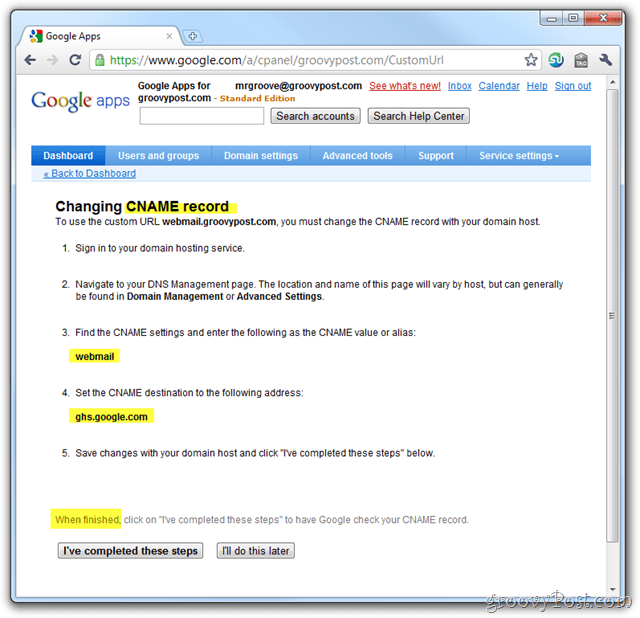
Follow the instructions on the next page to create a CNAME record for the custom address you entered in Step 2 above. #3 and #4 in the below screenshot is the CNAME and destination you need to use when setting up the CNAME record.
In the first article of my Google Apps series I explained How-to create a CNAME record for Dreamhost hosted domains however if your not using Dreamhost for your domain or DNS, here’s another list provided by Google which explain the process for other common ISP / Hosting providers:
GoDaddy.comix web hosting1and1EveryDNS.netLunarpagesYahoo!SmallBusinessNo-IPDNS ParkeNomNetwork SolutionsMyDomain.comDreamhostDomain Directgandi.neteurodns.comregister.commyhosting.comI don’t know who my host is
- After your CNAME record is created and pointing to ghs.google.com, Click I’ve Completed these steps.
Step 4 – Cutover your Domain MX Records to Google Apps
Ok everyone, brace yourselves! Now it’s time to cutover your MX records which in Email talk means configuring your domain to deliver all future email to Google Apps. This should only be done when your 100% sure all your email accounts have been created and your Catch-All setting has been configured (just in cast). Ready?
Click the Service settings Tab, Email and Instructions on how to activate Email
READ EVERYTHING! Ok, Click Change MX records
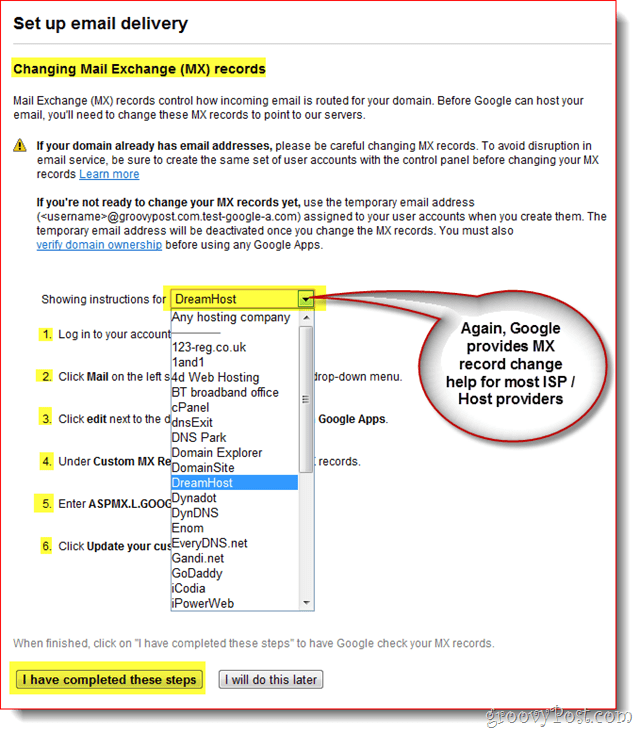
Once again, to help the non-technical Google Apps customers, Google has provided the steps for changing the MX record for the most common / largest ISP / Hosting providers. If your Hosting Provider is not listed or you are completely confused, rather than continue forward I recommend you get help from your ISP / Hosting provider for step 3 below. 3. Click the down arrow for Showing Instructions for: and Select your Domain/DNS hosting provider. Now follow the steps listed to change the MX record for your domain. When your MX changes are completed, Click I have completed these Steps. Note: Once again, if your confused here STOP. When messing around with your domains MX record, it’s better to pay $15-25 on a support call than make a mistake and break your email for you and your employees.
At this point you should be taken back to your dashboard and everything should pretty much be done!
Step 5 – Test Email and Various CNAMES Configurations
Since your going to be the Google Apps system administrator, I recommend you setup a separate email account somewhere like mail.live.com or mail.yahoo.com so you can send emails around for testing and other purposes. This is also a time you should test out the custom CNAMES you created IE: webmail.yourdomain.com etc…
Step 6 – Finish Up With a Few Final Touches
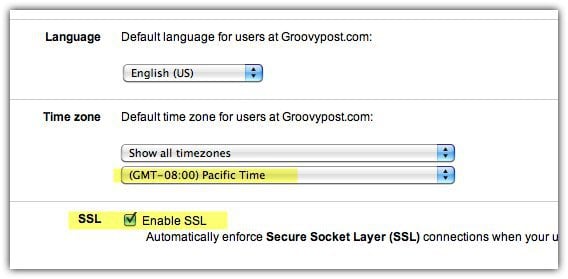
Although not necessary, I also recommend you setup time zone info, secondary contact info as well as enable SSL when you and your users visit Gmail, Calendar, Docs, and Sites on your Google Apps account / domain. 1 – Click Domain Settings Tab, General. Under Contact Information, fill in an email address not associated with your domain and Check the box In case of forgotten administrator password, send password reset instructions to secondary contact.
2 – Scroll down and Set Time Zone and Check Box to Enable SSL on all Google Apps service pages
There’s still a lot you can do with Google Apps but I think this article is long enough already… ;) So stay tuned for my next article where I’ll review the various options available for connecting to Google Apps to read and manage you email. Plus, if you want to upgrade to the premier service you can get even more control and protection from the Postini service which is free with the Premier accounts. Not needed IMOP for “spam” but it does give you other features like whitelist, inbound and outbound anti-virus screening, detailed reports and on and on…. http://www.google.com/postini/compare.html Again, not needed for the basic user or company but, an option. Comment Name * Email *
Δ Save my name and email and send me emails as new comments are made to this post.


![]()
