Doing this, however, restricts any changes to the document as a whole. Thankfully, Microsoft Word includes additional controls that allow you to protect parts of a Word document from editing. You can restrict changes by limiting the available formatting options or by restricting the areas that can be edited. If you’re part of a Windows domain, you can also use the Rights Management Service (RMS) to restrict document editing, based on your user account. To protect parts of a Word document from editing, here’s what you’ll need to do.
Restrict Word Document Editing by Formatting Style
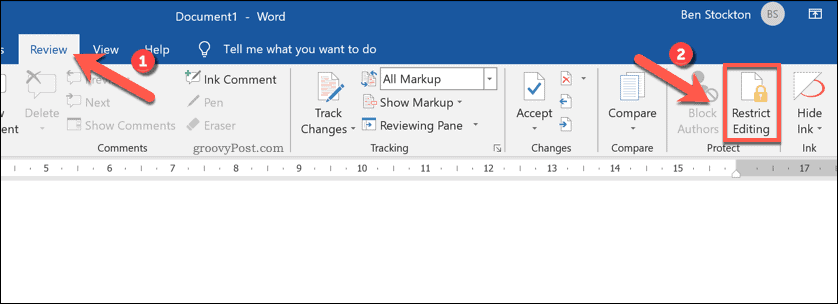
If you want to allow changes to your Word document, but restrict the type of formatting that can be used (for instance, to maintain a set style), you can do this using the Restrict Editing menu. To access it, open your Word document. From the ribbon bar, press Review > Restrict Editing. A menu panel on the right will appear.
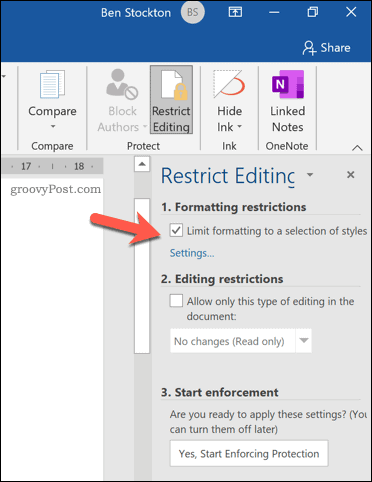
To limit certain formatting styles from use, select the Limit formatting to a selection of styles checkbox, then press the Settings option underneath.
In the menu, select the styles you wish to allow on your document. If you want to use Word’s recommended minimum option (with only basic styles available), press Recommended Minimum. Alternatively, press None or All to select or uncheck all items. Once you’re happy with the formatting options selected, press OK to save the settings.
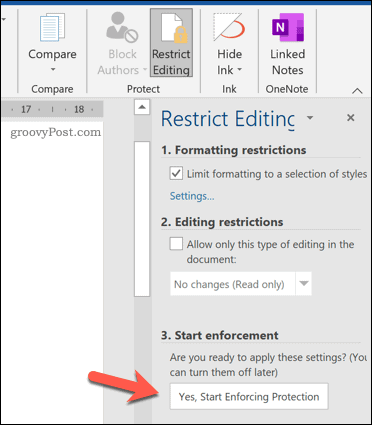
The formatting settings will apply once you’ve enforced the change. To do this, press the Yes, Start Enforcing Protection option.
In the Start Enforcing Protection box, provide a control password. This will stop users without the password from disabling protection. However, as the document isn’t encrypted, these restrictions can be bypassed with some ease. Alternatively, select User authentication, with only authorized users on a Windows domain allowed to remove the password. The document will be encrypted, but this choice is restricted to corporate or educational users using the Rights Management Service (RMS). Press OK to save your choice.
Once saved, only the formatting options you selected will be available in your document. You won’t be able to use other formatting options without disabling the enforcement and returning your document to normal.
Restrict Word Document Editing by Selection
If you want to limit the changes to your document to certain areas (for instance, single paragraphs or lines), you can also do this using the Restrict Editing menu. Start by opening your document and pressing Review > Restrict Editing. From the menu panel on the right, click the Allow only this type of editing in the document checkbox, then select the No changes (Read only) option.
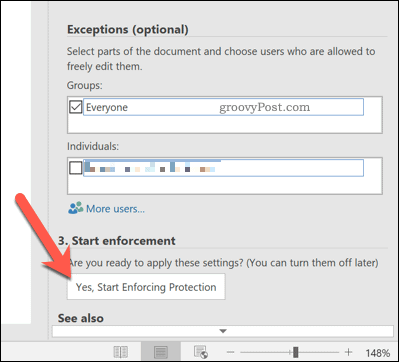
This will prevent areas that aren’t covered by exceptions from being edited. To add an exception, select an area of your document (from a single word to an entire paragraph or page), then press the Everyone checkbox, listed under the Exceptions (optional) category.
This will allow everyone with access to the file the ability to edit that section of your document. If you want to add tighter restrictions instead (for instance, to allow only individual users the right to edit a section), select the content, then press the More users option.
In the pop-up Add users menu, add the usernames of local Windows users or user accounts on a Windows domain. Press OK to save your choices.
With the content selected, click the checkbox next to their username, visible in the Individuals section. Only that user will be able to make changes. Make sure the Everyone checkbox is disabled if you want this to be the case.
To confirm the restrictions, press the Yes, Start Enforcing Protection button.
In the Start Enforcing Protection box, provide a control password, or choose User authentication to give control to authorized domain users instead. Press OK to save.
Once saved, only the areas of the document you selected will support edits (highlighted gray in your document). Unless otherwise specified, only users with access to the file will be able to make changes to those sections.
Using the Rights Management Service (RMS) to Restrict Changes to Word Documents
The Rights Management Service (RMS) on Windows helps to prevent unauthorized users from viewing, editing, or printing certain documents. This type of protection is only available for users on a Windows domain, such as university or corporate users. You’ll need to speak network administrator to confirm that you have RMS enabled on your network. You’ll also require sufficient user access to restrict document editing in this way. If you’re on a Windows domain with RMS support and access, open your Word document. From the ribbon bar, press File > Info.
From the menu, press Protect Document > Restrict Access > Restricted Access and enable the Restrict Permission to this document checkbox is enabled. Otherwise, press Connect to Rights Management Servers and get templates to connect to a suitable authentication server on your domain.
When prompted, add the email addresses of other users to give them suitable access to your document. This gives those users access to the file, selecting Read or Change to give them read or write access. Press OK to save the changes. Once set, only those users will have access to view or edit the document. Access is also restricted to authorized domain users only.
Protecting Office Documents
By protecting parts of a Word document from editing, you can develop more varied types of documents. For instance, by limiting some sections from changes, you can turn a Word document into a fillable form that users can fill out and return. Other Office documents can be protected in similar ways, with the ability to encrypt OneNote notebooks and protect individual pages and sections. If you export your Word document to another format, you can still protect the file from changes. If you decide to add passwords to PDF files, for instance, you can limit who has access to the file, protecting it from unnecessary views.


![]()
